Creating a SCIONLab AS
SCIONLab Portal Overview
In order to create a SCIONLab AS you must login on SCIONLab. In case you don’t have an account yet, please follow the registration process.
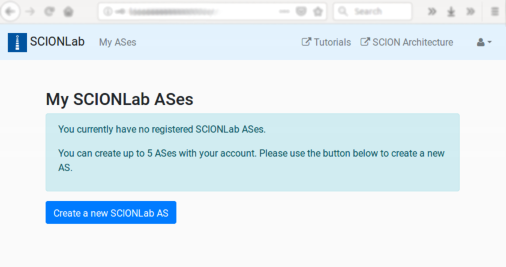
After logging in, you will land on the My ASes page.
- The
My ASeslink in the navbar brings you back to this page when you navigate away. - The drop-down menu under the -symbol in the navbar contains links to change your password and to log out.
This view is initially empty, later you will see a list of your ASes:
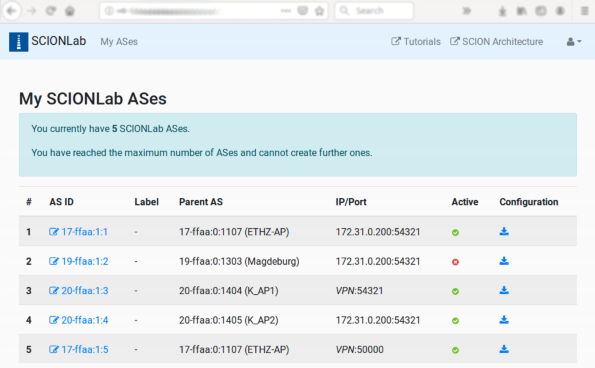
- The columns in this summary refer to the configuration you’ve made for this AS, as discussed below.
- The link with the -symbol in the
AS IDcolumn brings you to the edit page for an AS. - The link with the -symbol in the
Configurationcolumn lets you download the configuration tarfile for an AS. - The tick or cross in the
Activecolumn indicates whether an AS has been deactivated (using the corresponding button or check-boxes in the edit page).
Configure a SCIONLab AS
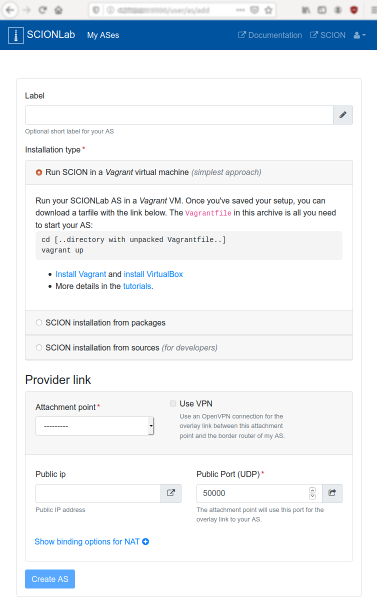
The Create a new SCIONLab AS button or the edit link for an existing AS will bring you to the same configuration form.
-
Label: here you can add a short label for your AS that will be displayed on the
My ASeslist page. This label just helps you identify your ASes and doesn’t have any other functionality. -
Installation Type: select the way you have installed or will install SCION. Please refer to Installation/Pick an Option.
-
Make this AS a publicly available Attachment Point: select this if you want your User AS to be an Attachment Point.
Other users will be able to select your AS as an Attachment Point for their ASes. As Attachment Point, your AS serves as a transit provider, connecting these child ASes to each other and to the rest of the SCIONLab network.
Your host needs to refresh its configuration whenever other users create or modify links to your AS. For this, it will need to run the scionlab-config daemon. Only Attachment Points that are running this scionlab-config daemon will be listed as available options to other users. When setting up your Attachment Point host, first follow the instructions to install and configure your host as usual. Then enable the
scionlab-configdaemon withsystemctl enable --now scionlab-config.service.-
Public IP: enter your Public IP Address that should be used for connections to child ASes. This field is required when the
Make this AS a publicly available Attachment Pointfield is selected. -
Provide VPN: select this option if you want other ASes to be able to connect to your Host using an OpenVPN tunnel.
-
The following options configure the “Provider links” for your AS. For each of your ASes, you can create up to 5 overlay links to provider infrastructure ASes called “Attachment Points”. Each of these links is a Provider-Customer link in the SCION network topology, which cannot cross ISD (isolation domain) boundaries. Thus, you can create only links to Attachment Point ASes in the same ISD.
The interface is restricted to only add one link at a time. During creation of your AS, you can define (exactly) one “Provider link”, later you can modify/add/remove links.
The following options configure each “Provider link”, that is, the options define the parameters for the overlay link between the border router in your AS and the border router in an Attachment Point AS.
-
Attachment Point: this selects the provider AS to which a link will be established. This selection also determines the ISD which your AS will belong to.
For lower latency, prefer to pick an Attachment Point that is closest to you – the topology map on the SCIONLab home page has some hints on the geographical regions in which the ASes are located.
-
Use VPN: if enabled, an OpenVPN tunnel is configured between your AS and the chosen Attachment Point.
The
IP addressoptions below will disappear, as the VPN-internal IP address will be used in the border router configuration.Use this option if:
- you don’t have a static public IP address or
- you are behind a NAT or firewall and you cannot open/forward a chosen UDP port
- you want to “just make it work”, as you’ll need to know no further details about your network configuration
The configuration file will contain an OpenVPN configuration file named
client-scionlab-<attachment point ISD-AS>.conf. After extracting this file to/etc/openvpn/, you can start the tunnel by runningsudo systemctl start openvpn@client-scionlab-<attachment point ISD-AS>. -
Public IP Address, Bind IP Address
Find your public IP e.g. by visiting checkip.amazonaws.com or by running
dig +short myip.opendns.com @resolver1.opendns.comFind your local IP address e.g. by running
ip route get 8.8.8.8 | head -1 | cut -d' ' -f8If your host has a public IP (the public IP is identical with the local IP), only fill in the
Public IP Addressfield and leave theBind IP Addressfield blank.If you are in a network behind a NAT (i.e. the public IP and local IP are different), fill the
Public IP Addressfield with the public IP and theBind IP Addressfield with the local IP address.
note
Currently, IPv6 cannot be used. Even though support for IPv6 is implemented, none of the currently available Attachment Points have an IPv6 address configured.
-
Public Port:
Choose a UDP port on which your Border Router will be reachable. We typically use ports in the range 50000-51000 by convention, but you’re free to choose any other.
If you are behind a NAT or firewall, make sure to open/forward the chosen port. For this you may need to contact your network administrator.
Download and install configuration
After creating or modifying your AS as described above, you can deploy the generated configuration to your machine. The procedure for this depends on which type of SCION installation you chose. Please follow the instructions on the individual pages.
- Instructions for
Run SCION in Vagrant virtual machine - Instructions for
SCION installation from packages - Instructions for
SCION installation from sources